Gieta Laksmana
  • Blog
  • Profile
  • Projects
    • VR World Arcade
    • Punch For Fun
    • Spectrum
    • Dimension Battle
  • Resume

XCode10 and prebuild script output files xcfilelist

10/14/2018

0 Comments

 
​Found another quirk with XCode 10. Although this time they did mention it on their release notes (I read the release notes after I hit this issue).

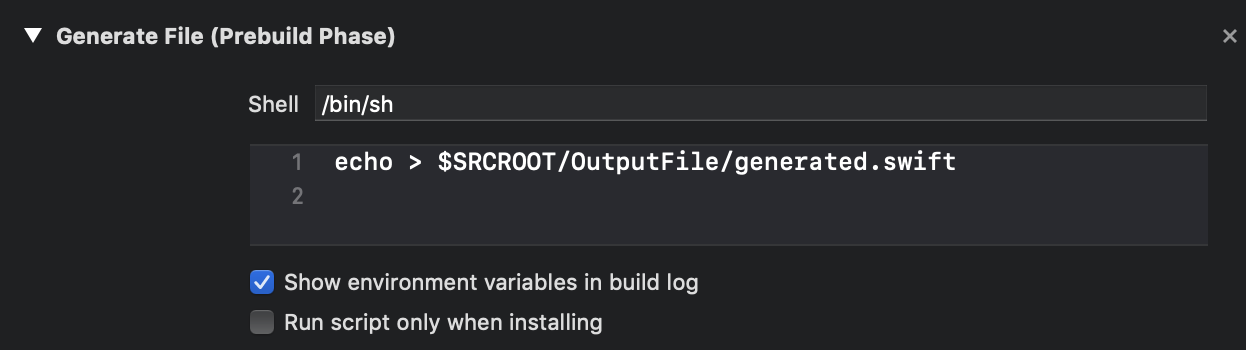
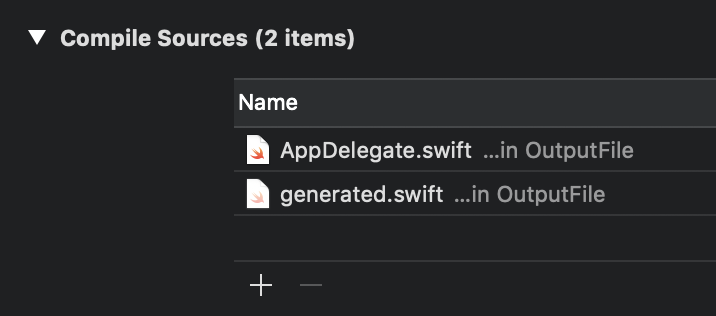
Let's say you have a simple project that generates a file on your pre-build phase, and you include that file on the compilation phase.
Picture
Picture
​This setup will work just fine on Xcode 9 with the old build system. However, on the new build system on Xcode 10, when you build the project for the first time you will get an error saying that the file couldn't be found:
Picture
​When you try to check if the file was there, you will be hit with confusion as the file is generated properly. So what's up with that?

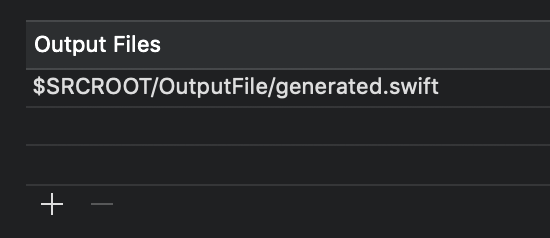
According to Xcode 10 release notes, you now have to explicitly add the generated files name in the Output Files field of the phase, otherwise the build system might try to search for the files before they are generated.​ 
Picture
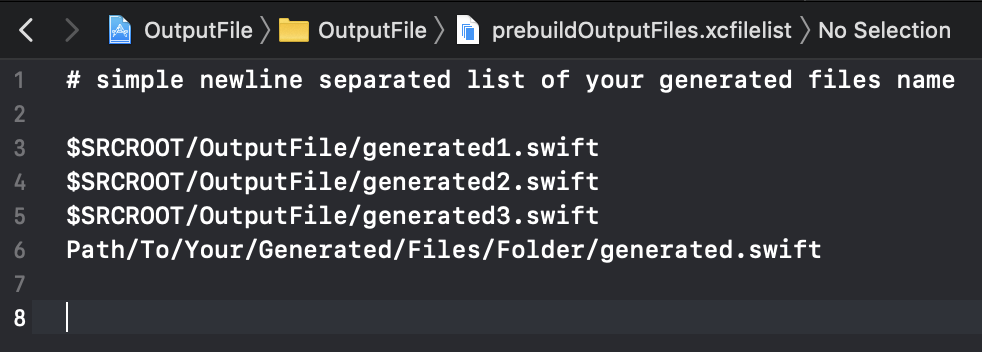
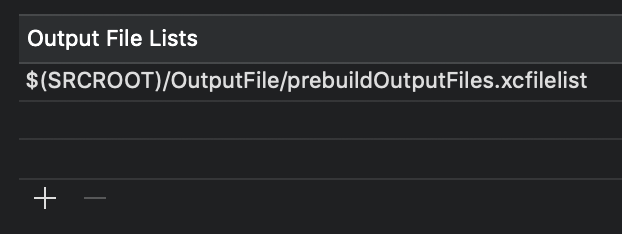
If you have several generated files that are being used by multiple targets and don't want to duplicate your efforts, you can use the new xcfilelist file that is available for XCode 10. Simply list the generated files inside the xcfilelist, and assign the xcfilelist as an Output File Lists of the phase
Picture
Picture
aand voila, the build system should now find your file correctly

Here's the full Xcode 10 release notes:
​
https://developer.apple.com/documentation/xcode_release_notes/xcode_10_release_notes/build_system_release_notes_for_xcode_10

0 Comments

CoreData on macOS Mojave (10.14.0) shenanigans

9/26/2018

0 Comments

 
UPDATE (10/16/2018): Apple has closed my bug report about this as resolved. So hopefully the fix will be out on Mojave 10.14.1

tldr: overwriting a binary blob greater than 100kb will unnecessarily create extra files on each save with CoreData on macOS Mojave (10.14.0)
​Hookay, I was pretty excited to try out macOS Mojave and their dark mode. Instead I found a bug in CoreData

If you'd like to follow along the code, the code is available at my github:
https://github.com/gietal/AppleSandbox/tree/master/CoreData/CoreDataPlayground

Quick overview of CoreData, it stores your data in a sqlite database which live in your App's "Application Support" folder under ~/Library/<Your app bundle identifier> or ~/Library/Containers/<Your app bundle identifier>/Data/Library for sandboxed apps. You can store different types of data with CoreData such as string, int, float, bool, and even binary blob. When storing binary blob, you have an option to store it on an external storage:
Picture
​This is useful for bigger binary blob, as it’s less efficient to store and fetch a big binary blob form the sqlite database. If you try to store a big binary blob (bigger than 100kb), and you have that option enabled, CoreData will automatically decide to store your blob into a hidden folder called <Your DB name>_Support/_EXTERNAL_DATA
Picture
​The blob will be stored as a file named with a random UUID, and that UUID is what’s then stored in the sqlite database. You can examine your sqlite database content with DB Browser for SQLite (free from https://sqlitebrowser.org). You can see that the value for my binary blob attribute is the UUID of the file under _EXTERNAL_DATA. This is how CoreData manages your big binary blob.
Picture
Picture
The value of the binary attribute in the sqlite DB is actually the UUID name of the file on the _EXTERNAL_DATA folder
​When you update your binary blob from your code, then the blob file under _EXTERNAL_DATA is also overwritten with the new blob. However, this is not the case in macOS Mojave 10.14.0, which is demonstrated by my sample project

The sample project is quite simple, I have have an Entity with 2 simple attributes: an id (string) and an image (binary blob) with “Allows External Storage” selected. The id is so that I can fetch the same instance of the entity. When you run the app, you will see a window with a save button. 
Picture
Picture
Each time you hit the save button, it will try to save the displayed image as a binary blob to the entity’s instance in the sqlite database. Since the binary blob is greater than 100kb, it will store it under:
~/Library/Containers/com.gietal.sandbox.CoreDataPlayground/Data/Library/Application Support/CoreDataPlayground/.CoreDataPlayground_SUPPORT/_EXTERNAL_DATA

If you hit the save button multiple times, it will try to overwrite the binary blob with the same image every time. Now here’s where the problem lies. On macOS High Sierra (10.13.6) there is no issue with this, the binary blob is overwritten correctly. On macOS Mojave (10.14.0) however, this is not the case.

When you try running the same app on macOS Mojave, and start hitting the save button multiple times, you will observe that a new file keeps getting added under the _EXTERNAL_DATA folder. This is a serious problem as overtime the amount of useless files keep getting piled up inside this hidden folder. Normal non-savvy users would never know how their mac ran out of space so quickly due to this issue.

I submitted this issue to Apple’s Bug Reporter, and they acknowledged that it was a bug and are working on a fix. Hopefully macOS Mojave 10.14.1 come out soon with a fix for this.

A workaround you can do at the moment is to save the entity’s instance with a nil value for the binary attribute, and save it so that CoreData delete the external file. Then, you can save the instance again with the proper binary blob.
// magic functions to get the CoreData context and entity's instance
let context = getContext()
let entity = getEntity()

// nil out the binary blob, so CoreData erases the file in _EXTERNAL_DATA
entity.setValue(nil, forKey: "image")
context.save()

// then actually save your new blob
entity.setValue(blob, forKey: "image")
context.save()
0 Comments

NSWindow positioning shenanigans

8/4/2018

0 Comments

 
You're playing around with NSWindow, and you find this function called setFrame, setFrameOrigin, and setFrameTopLeftPoint. You feel like you are the king of the world when the thought of being able to move your window anywhere programmatically consume you. Except that when you realized that Cocoa stops you from doing that.

Cocoa allows you to move the window anywhere using those functions, except when your window starts going above the menu bar.

For instance, consider the following scenario:
  • Screen Configuration:
    • Resolution at 1280 x 800
    • Menu bar height = 22 pixel
    • Which means, the menu bar starts at y = 778 (Cocoa coordinate start at the bottom left)
  • Your Window:
    • Size is 100 x 100

When you call window.setFrameTopLeftPoint with the position of (x: 100, y: 800) your window's top left will actually be positioned at (x: 100, y: 778), right under the menu bar.

Same goes with the other setFrame* variants, your window will be pushed down until no part of your window is above the menu bar.

This is of course unless your window is the size (or bigger) than the screen, in which case it has no choice.
0 Comments

NSPopUpButton shenanigans

7/8/2018

0 Comments

 
​action/value bound to NSPopupButton is only triggered when user changes the value from the UI. It doesnt get triggered when you change the value programmatically.

For example, if we bind the NSPopupButton's selected index property:
​
Picture
internal var selectedIndex: AnyObject! {
    didSet {
        let oldIndex = oldValue as? Int
        let newIndex = selectedIndex as? Int
        print("selectedIndex didSet, old: \(oldIndex), new: \(newIndex)")
    }
}
changing the selected value via the UI will trigger selectedIndex.didSet as expected
Picture
However, when we change the index programmatically such as this:
popUpButton.selectItem(at: 2)
Doing so will change the value in the UI, but it won't trigger selectedIndex.didSet as expected.

A bigger issue happens when we have this scenario:
  • ​User selects index 1 from the UI
  • We programmatically call popupButton.selectItem(at: 2), the UI changed to show that index 2 is selected
  • User reselects index 1 from the UI
  • selectedIndex.didset is not called for the user action!!
       
This happens because when we change the selected item programmatically to 2, selectedIndex's value doesn't actually change, it stayed at 1. So when the user change the index back to 1 via the UI, Cocoa realized that the value of selectedIndex is still the same (1), so it decided not to call the didset function.
0 Comments

NSWindow.level shenanigans

11/18/2016

1 Comment

 
lately I had to deal with window layering and ordering is Swift. I had to make sure some windows are always on top of other windows. This can be done with window levels.

in objective-c I found that you can simply call [NSWindow setLevel] with defined values such as NSMainMenuWindowLevel. in Swift, these defines doesnt exist. we have to use CGWindowLevelKey enum

However, this enum is not a value we can use directly for NSWindow.level. We have to convert it to a usable value 
by using CGWindowLevelForKey(), which returned an Int32. Since NSWindow.level is an Int, we also have to cast it to Int.
    window.level = Int(CGWindowLevelForKey(.normalWindow))

Here's the list of the values of CGWindowLevelKey sorted from bottom to top. At the time of this writing, these values are generated with Swift 3.0.1 and macOS 10.12 SDK
​

baseWindow: -2147483648
minimumWindow: -2147483643
desktopWindow: -2147483623
desktopIconWindow: -2147483603
backstopMenu: -20
normalWindow: 0
floatingWindow: 3
tornOffMenuWindow: 3
modalPanelWindow: 8
utilityWindow: 19
dockWindow: 20
mainMenuWindow: 24
statusWindow: 25
popUpMenuWindow: 101
overlayWindow: 102
helpWindow: 200
draggingWindow: 500
numberOfWindowLevelKeys: 999
screenSaverWindow: 1000
assistiveTechHighWindow: 1500
cursorWindow: 2147483630
maximumWindow: 2147483631

1 Comment

MacOS Multi Monitor Shenanigans

10/25/2016

0 Comments

 
let's say you want your Mac app to have multiple windows, pretty reasonable request right? Now, lets say you have 2 monitor setup on your Mac, and you like to have each window on its own screen. Move one window to the first screen, and move the other window to the second screen, got it. Now what if you want both to be full screened on each screen?

if you have this setting under System Preferences > Mission Control enabled,
then you wont hit this problem. But if you're like me and have it disabled, you might be wondering why your secondary monitor stays black. keep on reading...
Picture
Displays? Spaces?

One of the key feature in MacOS is Spaces. It's that thing that you see at the top when you go to Mission Control (usually by pressing F3 in most Mac keyboard) that helps you organize and declutter apps windows.

The deal with the setting I mentioned in the beginning has to do with what happen when you attach a second, or third, or 'n'th monitor to your Mac. If you have the setting enabled, it will create a Space for each monitor. But if you disable it, all monitors will share the same space.

This isn't really an issue until you want your app to be fullscreened. When a window is changed to full screen, MacOS will create a new exclusive space for it and move the window there.

So when you make 1 of your window a fullscreen window, a new exclusive space will be created, and only your window will be placed there. To add your other windows to this fullscreen space, you need to do this to your window:
window.collectionBehavior.remove(.fullScreenPrimary)
window.collectionBehavior.insert(.fullScreenAuxiliary)
0 Comments

Xcode 8 Swift 3 compiler bug segmentation fault 11

9/21/2016

0 Comments

 
Recently I've had to go through the hellish task of upgrading my Swift 2 projects to Swift 3. tldr, 1000+ errors fixed later, I was left with 1 persistent error. command failed due to signal: Segmentation fault: 11

​I've never seen this compiler error before, and preliminary research suggested that it's a possible bug in the swift compiler itself.

Thankfully it tells me which file did the fault happened:
While type-checking declaration 0x7fc447c12e00 at /Users/gietal/dev/project/source/Extensions/FileManager+Extensions.swift:5:8
​
It doesn't tell me where in the file did it breaks, but at least I had a starting point. Luckily this file of mine is not that huge, so I'm able to brute force isolate each functions in the file and found that the culprit is a very specific function declaration.

This form of function declaration is the one that's causing the segmentation fault:
public extension FileManager {
  public func foo() throws -> URLRelationship {
    return URLRelationship.other
  }
}
I've found that omitting the throws keyword will avoid this error:
public extension FileManager {
  public func foo() -> URLRelationship {
    return URLRelationship.other
  }
}
This is a very weird behaviour, since if I mark the function with the throws keyword and have it return anything else EXCEPT URLRelationship it will compile just fine. This only happens if the function is marked throws and returns a URLRelationship.

I've filed a bug to Apple regarding this, as I've found someone else had had a similar issue like this with Swift 2.2 before:
​http://blog.bellebethcooper.com/xcode-bug.html

Anyway, this has been an annoying one to track. For now I will just have to workaround the issue by omitting the throws keyword and handle error thrown inside the function some other way.

I hope this post can help someone else who ran into the same issue. If this doesn't help, at least I hope this can give you some ideas into where to start isolating your code to find the offending piece of code.
0 Comments

Interesting Swift Lambda (closure) syntax

6/23/2016

0 Comments

 
Learning swift for iOS and macOS development. I was creating a closure to sort strings reversely this way:
let reversed = names.sorted(by: { 
    (s1: String, s2: String) -> Bool in 
    return s1 > s2 
})
The sort() function simply takes a function that takes 2 strings and returns a bool. What I didn't realize is the the "operator >" that I'm using on the closure is itself a function that takes 2 strings and return a bool.

So that chunk above can be reduced to:
let reversed = names.sorted(by: >)
0 Comments

How to handle Application Exit event on PRISM 5

6/15/2016

0 Comments

 
A couple months ago, I encountered an issue in which I have to perform some cleanup on one of my ViewModel. I know that there's an OnExit() function on the Application class, but I didn't know how to let my VM know from here without causing some tight coupling between the Application class and my VM (which is not ideal).

I gave up trying to solve it since I couldn't found a viable solution back then, and always put this bug aside. Today I decided to spend the day fixing this issue, and I did, with a lot of help from the internet.

The solution was to use the EventAggregator in the PRISM 5 library

1. Make a singleton which contain the EventAggregator
// singleton event system 
public static class EventSystem
{
  public static IEventAggregator Instance
  {
    get
    {
      // ?? operator, return left if not null, otherwise, return right
      return m_Instance ?? (m_Instance = new EventAggregator());
    }
  }
  private static IEventAggregator m_Instance;
}
2. Create the Event to be broadcasted
public class ApplicationExitEvent : PubSubEvent<int>
{
}
3. Make my VM subscribe to the event
token = 
EventSystem.Instance.GetEvent<ApplicationExitEvent>().Subscribe(
  OnApplicationExit, 
  ThreadOption.PublisherThread
  );
The ThreadOption CANNOT be UIThread, I guess since the UI is closed there's no more UI Thread.
The token is used to unsubscribe from the event (not shown)

4. Broadcast the event from Application.OnExit
protected override void OnExit(ExitEventArgs e)
{
  // broadcast that we're exiting
  EventSystem.Instance.GetEvent<ApplicationExitEvent>().Publish(e.ApplicationExitCode);
}
I wonder if I would've solved this issue a lot sooner if I know about EventAggregator beforehand (I didnt know about it before I found someone else's blog trying to solve the same issue)

Links that helped me:
  • Richard Dutton's blog
  • Rachel Lim's blog
  • PRISM 5 Event Aggregator Quickstart
0 Comments

Cyber Security 101

5/8/2016

0 Comments

 
A couple days ago, there was a seminar/training on cyber security at my workplace. The seminar reminded me of how little I know about cyber security. I looked around the internet for additional resources to increase my understanding on cyber security. In my findings, these resources helped me understand the basic of cyber security (without getting technical)

http://www.pbs.org/wgbh/nova/labs/videos/#cybersecurity

they also have an interactive game to help understand how malicious hackers try to hack/steal information from you

http://www.pbs.org/wgbh/nova/labs/lab/cyber/research#/newuser
0 Comments

    Archives

    September 2018
    August 2018
    July 2018
    September 2017
    July 2017
    November 2016
    October 2016
    September 2016
    June 2016
    May 2016
    March 2016

    Categories

    All
    Shenanigans
    Software Engineering
    Swift
    Vr
    Xcode

    RSS Feed

Powered by Create your own unique website with customizable templates.